Web Tech Guide

www.blogsmonetize.com feed

How to Change Feedburner Email Subject Line

Google FeedBurner

Once, you change the title of your blog, the subject line of your Feedburner Email Subscription won't change automatically. You have to do it manually.

1. Login to your Feedburner account
2. Go to Publicize tab --> Email Subscriptions  --> Email branding
3. Change what you want your subject line to be under the "Email Subject/Title" box. You can also put the last post title here. For example,  "${latestItemTitle} - WebTechGuide".
4. If you have more than 1 post /day. You can check the option," Change Subject when an email has 2 or more items". You will have more options to refine your subject line, such as:

WebTechGuide: ${latestItemTitle}
WebTechGuide: “${latestItemTitle}” plus ${m} more
WebTechGuide (in this message: ${n} new items)

${n}:  shows the total number of items
${m}:  shows the number of items beyond the latest

Read More...

How to Add Google +1 to Your Webpages

adding google +1 button

Recently, Good has added another button for webmaster. Adding this button to your website will enable your visitors who love your webpage content recommend it on Google search. As a result, you will have better rank in Google search engine.

Adding google +1 to your website is easy, just follow the following steps:

1. Login to your account --> Design --> Edit HTML
2. Click on "Download Full Template" to backup your template.
3. Check "Expand Widget Templates"
4. Search for

</head>
5. Add the following code above it
<script type="text/javascript" src="http://apis.google.com/js/plusone.js"></script>
6. Search for
<data:post.body/>

7. Add one of the following code above that code

Standard style:

google +1 standard
<g:plusone></g:plusone>

Small style:

google +1 small
<g:plusone size="small"></g:plusone>

Medium style:

google +1 medium
<g:plusone size="medium"></g:plusone>

Tall style:

google +1 tall
<g:plusone size="tall"></g:plusone>

8. If you don't want to have the counter. You just put the count="false" atribute to the above code, such as

<g:plusone count="false"></g:plusone>
Read More...

New Google +1 Button Which Enhances the Google Search Engine

Google  recently released a new button that is called +1 (plus one). The +1 button is shorthand for "This page is pretty cool" or " You should check this page out". Once, you have +1 button on your website, it allows your visitors to recommend your page on Google search result pages.

google plus one button

As a user, in order to recommend a page, you need to have a Google profile. you can use your profile to see all of your recommended pages in one place. You can also delete what you no longer recommend. You can also use this +1 button feature on search engine result page if you already logged into your Google Account.

Check this post out, for more information about this new button

Read More...

Style the "Newer Post", "Home", and "Older Post" of Blogger Pager

As a blogger, you always try to make your template looks better. You can also try to style the "Newer post", "Home", and "Older Post" link.

blogger pager

To make this pager looks like the following (note: I don't have the "Home", since I took it out):

style blogger pager

Add the following code to your style section

#blog-pager-older-link, #blog-pager-newer-link, .home-link{background:#FFF0B7; padding: 5px 5px 5px 5px}
1. Login to your account --> Design --> Edit HTML
2. Click on "Download Full Template" to backup your template.
3. Check "Expand Widget Templates"
4. Search for the following code and add the above code before it
]]></b:skin>
Or you can add the above code from Template Designer--> Advanced--> Add CSS.

Now you have a great look of your blogger pager. If you know css, you can modify the above code a bit to make it work best on your blog.

Read More...

Move Comment Form Above the Comment Messages for Blogger/BlogSpot Blog

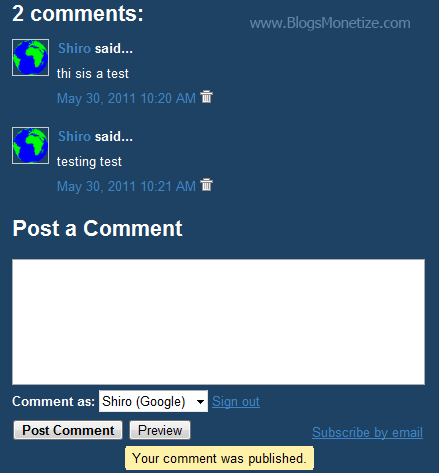
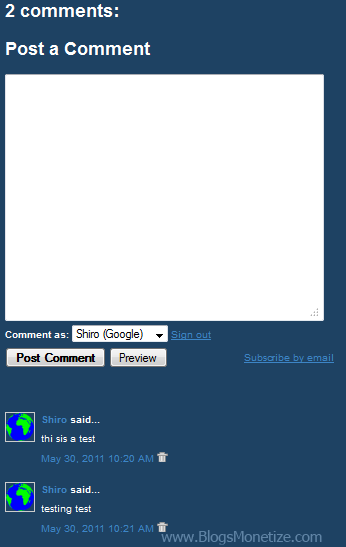
By default, the comment form in blogger is always below the comment message. In this tutorial, I'll show you how to move the comment form to above the comment messages.

Before doing this tutorial:

comment form before doing tutorial

After doing this tutorial

Comment form after doing tutorial

1. Login to your account --> Design --> Edit HTML
2. Click on "Download Full Template" to backup your template.
3. Check "Expand Widget Templates"
4. Search for  (or similar code)

<p class='comment-footer'>
<b:if cond='data:post.embedCommentForm'>
<b:if cond='data:post.allowNewComments'>
<b:include data='post' name='comment-form'/>
<b:else/>
<data:post.noNewCommentsText/>
</b:if>
<b:else/>
<b:if cond='data:post.allowComments'>
<a expr:href='data:post.addCommentUrl' expr:onclick='data:post.addCommentOnclick'><data:postCommentMsg/></a>
</b:if>
</b:if>
</p>

5. Move the above code after the following code

<b:includable id='comments' var='post'>
<div class='comments' id='comments'>
<a name='comments'/>
<b:if cond='data:post.allowComments'>
<h4>
<b:if cond='data:post.numComments == 1'>
1 <data:commentLabel/>:
<b:else/>
<data:post.numComments/> <data:commentLabelPlural/>:
</b:if>
</h4>

6. Save your template. You are done. You can check out a demo here

Read More...